This walkthrough is designed to teach the complete novice to Diaspora how to create their own missions. Unlike the quickstart earlier on the idea is to make a full, working, mission. After having read this, and building the mission yourself, you should be able to go straight to creating your own missions. It is important that you actually build the mission yourself. It won't take more than a couple of hours, but it will make you a much better FREDder than if you simply read it. You won't remember it all otherwise, and you'll waste a lot more time in the future trying to figure out how to do things that were taught in this walkthrough.
Since this walkthrough builds on the quickstart, it's assumed you've either completed that or at least read through it, so that you understand how to add ships, how to save your mission and how to test it.
Since the goal of this walkthrough is to teach you how to be a good FREDder, I'm going to walk you through the mission design process. Rather than teaching you how to make a finished mission, there will be some mistakes in the mission design process that need fixing as we go along. Debugging is a vital step in mission creation. It's not enough to know what you think you need to do to make a mission. You need to be able to figure out why the mission isn't working as planned.
This is an important and often overlooked part of mission design. Before you start creating a mission you should have a good idea what will happen in it. It is best to sit down with a pen and paper or a word processor, and plan out some of the details of your mission before you start. That said it's equally important not to over-plan. It is very rare for a finished mission to end up exactly as planned. As you build the mission, you'll find some of your ideas just aren't working (or you have no idea how to make them work!) and need to be rewritten. You might find the balance makes the mission too easy or too hard. Or you might just get an idea so cool, that it just has to be part of the mission.
The level of detail you want in a mission plan is an individual thing, but you must have some idea what's going to happen. Opening FRED when you only have a plan to make "the coolest mission ever!" and no other ideas, generally doesn't work very well.
Setting a mission during the fall of the twelve colonies only gives me a limited number of options for possible missions. For this reason we're going to set up a non-canon mission, where the Cylon plan fails, and they end up having to deal with a Colonial counter-offensive. This allows me to show you some things you couldn't see even if you looked at the Diaspora missions in FRED.
Here's the plan for the walkthrough mission. -
The player is a pilot on board the Battlestar Persephone. The Persephone is ordered by Fleet Headquarters to reinforce a pair of Bolitho class frigates. The frigates are currently attacking a Cylon basestar. Once the basestar is destroyed they will move on to a second one which was disabled by the Battlestar Triton. The Triton has now withdrawn after sustaining heavy damage from the two basestars. The Persephone is there to bring in some bigger guns than the Bolithos have and to help defend the Bolithos against attacks from raiders.
Initially the player will have to fight off a couple of attacks from Cylon forces but when the Cylons sortie a third basestar the player has to prevent it getting supplies to the second basestar so that it can be repaired and jump out.
Okay, it's not the coolest mission ever either, but it will give the player something to do and should hopefully be fun to play.
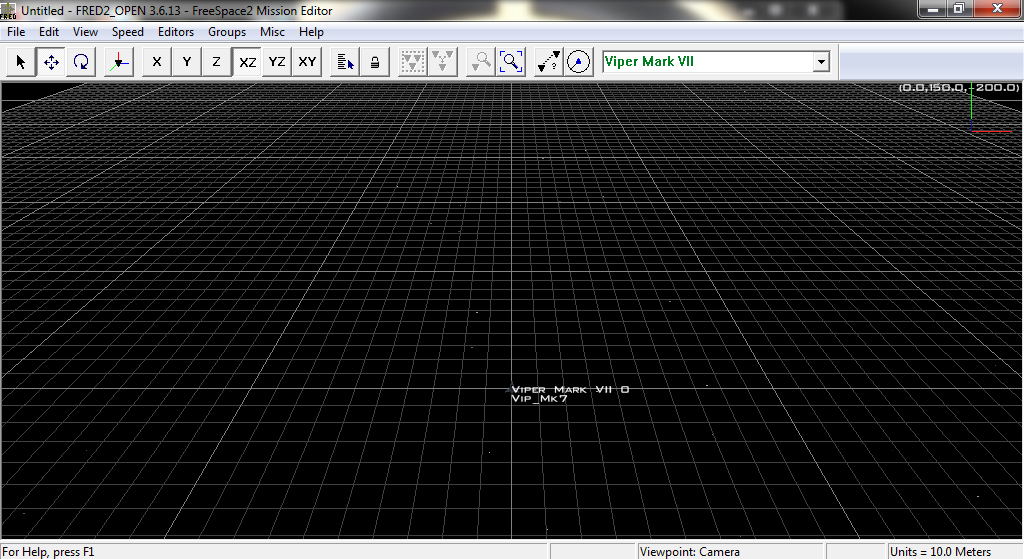
Run FRED and you'll be greeted with this screen.

There are a few schools of thought on how to build a mission. Some people like to build them in chronological order, first getting the first parts of the mission perfect before moving on to the middle and then end. Others prefer to build the main skeleton of the entire mission first, and then later flesh it out with more and more details later. Both methods have their own pros and cons so I'm not going to say which method is best. You'll have to decide for yourself which suits your own personal style.
For this tutorial we'll be doing the latter method as it introduces the main parts of the design process quickly and in their simplest forms. This gives you a chance to understand the basics of what the mission is doing before we add more details and make it harder to follow.
The first thing we're going to do is start by placing all the major ships. Skim through the sections of the help on the Toolbar, Ship Editor and Objects Editor. I'll be explaining what the buttons you need to press do as we go through this walkthrough, so you just need a basic idea of what the buttons do and where to find them. If at any point you get stuck, reading those sections in more detail should solve your problem.
Note : I strongly advise actually reading all the sections I'll tell you to skim through after completing this tutorial. That way you'll have a better idea what's possible before making your own missions.
First thing to do is to move the player ship as it's at 0,0,0 and we want to put our battlestar there. Select the player ship and either drag it to the left so it's out of the way or use the Objects Editor to move it about 1000m to the left (x=1000). We will reposition it later so don't worry too much about its position yet.
Now place the following ships.
| Ship Name | Ship Class | Position | Notes |
| Basestar 1 | Basestar | 104, 232, 8460 | Ships Flags: Escort
Ship, Priority 50
Initial Status: Velocity 0 Hull Integrity 20 |
| Basestar 2 | Basestar | 9000, 0, 14460 | Escort Ship, Priority
50
Velocity 0 Hull Integrity 76 Subsystems, FTL, 0 |
| Basestar 3 | Basestar | 11400, 1185, 9850 |
Escort Ship, Priority 50 Velocity 0 |
| Persephone | Battlestar Sobek Class | 0,0,0 | Escort Ship, Priority
60
Velocity 0 |
| Kubaba | Frigate Bolitho Class | -730, 800, 7150 |
Escort Ship, Priority 55 Velocity 0 Objects Editor : Point To basestar 1 |
| Cybele | Frigate Bolitho Class | -620, -220, 6690 | Escort Ship, Priority
55
Velocity 0 Point To basestar 1 |
| Persephone Moves In For Kill | Waypoint | 0, 0, 4500 | Use the Waypoint Editor to rename. |
| Kubaba Path | Waypoint | 6890, 600, 12386 | |
| Cybele Path | Waypoint | 6936, -100, 12764 |
If you click on the Zoom Extents button on the toolbar, you should now be looking at something like this.
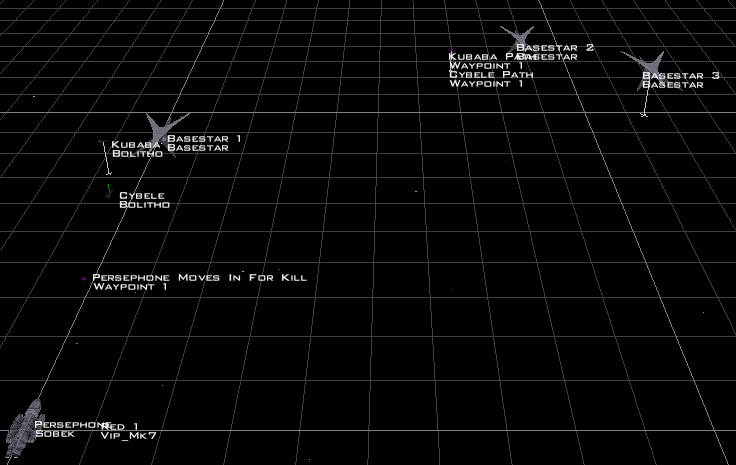
Note : In most missions it would be very poor form to leave the 3 basestars lined up to the same imaginary XZ Plane. Instead you should use the rotation tool to make all 3 at different angles from the Persephone and each other. However that can easily change the balance of the mission, making it easier or harder for the Colonials to hit them. So for this example mission, we'll leave them as is.
Now would be a good time to save the game but if you try the game will complain that the player should be a member of Alpha Wing. So we'll have to fix that first. Open up the Mission Specs Editor and click on Custom Names. Replace the word Alpha with Red
Note : You ought to be able to get away with only renaming the first one, but at time of writing, there is a bug that means FRED is only happy if you rename at least two of the entries. Little annoyances like this are common in mission design since the coders are usually busy fixing the more important bugs. Little unimportant ones that don't affect the mission are much lower priority to fix.
Since we're here anyway, change Beta to Black since we'll be adding that wing later. Now click on the player's viper and click on the Form Wing button on the Toolbar. Name the wing Red. We'll place more ships in this wing later but for now, let's keep things simple.
Now we can finally save the game. Remember that FRED can be quite unstable at times and therefore you should save every few minutes to avoid losing hours of work. If you wish, you can play the mission to check things out. Most FREDders tend to check things in-game every couple of saves as this allows them to check the mission is actually working the way they planned. It's generally a bad idea to try to write an entire mission in FRED and only then test it. You'll usually find you've made mistakes that require you to unpick or redesign things and the more work you've done, the harder this becomes. Additionally, the more work you've done, the more likely it is that you've hidden the mistake, making it harder to spot.
Note : Many mission designers actually work with both FRED and FS2_Open running at the same time. Commonly FREDders use the option in the launcher to launch FS2_open in a window. This allows them to save the mission in FRED and simply restart the currently running mission in order to update it with their changes.
If you've played the mission you won't see much of interest happening. The Bolithos will attack Basestar 1 and it will shoot back until it kills them or is killed itself but the Persephone and other Basestars will stay out of it.
Read up on the Briefing Editor and Command Briefing Editor next. I prefer to do the briefings at the start of writing a mission for two main reasons.
Open up the Command Briefing Editor first. We're going to do this in two stages but you could have easily squeezed this text into one.
| Stage | Text |
| 1 | OK pilots. I'm going to be swift and to the point on this one. As you all know the Cylons have broken the armistice and have launched an attack on our homeworlds. Initial casualties have been fairly light. It seems that the Cylons were relying on being able to hack into the newly installed CNP program. |
| 2 | When the Cylons tried to use their backdoor into the CNP, a nasty surprise was waiting for them. The virus only took down a few Cylons before the toasters were able to adapt to it, but the few minutes of chaos were enough for us to get the jump on them. Cylon actions have been pretty disorganised since. They clearly counted on the hacking to hurt us badly. |
The briefing will be a little bit more difficult. Make sure you click on Zoom Extents from the Toolbar before you get started. This will make settings things up a lot easier. First lets add the stages.
| Stage | Text |
| 1 | The Persephone just received orders to relieve the Battlestar Triton. The Triton was able to inflict heavy damage on the two battlestars it was engaged against before it was forced to jump out. Fleet Command has ordered the Persephone in to press the attack. |
| 2 | The Triton was escorted by two Bolitho class frigates, the Kubaba and the Cybele. Both have continued to bombard the 1st basestar but have reported that their fighter cover has been severely depleted by Cylon attacks. |
| 3 | The Persephone will jump and increase the pressure on Basestar One before moving in against Basestar Two. Basestar Two has taken damage to its FTL and engines and should be little threat while we neutralise Basestar One. |
| 4 | Red wing will reinforce the remaining fighters of Triton's air group in neutralising any Cylon fighters still present. In addition you will also be required to help intercept Cylon ordinance heading for the Bolithos, their point defence isn't as dense as ours. |
Change the Briefing Music : Default to Briefing 5. This is now the music which will be played in the Command Briefing as well as the Briefing itself.
Now we need to sort the icons out. We're going to leave the first stage blank since it deals with the Battlestar Triton and I'd rather not say that was yet another Sobek class (which I'd have to do if we gave it an icon in the briefing).
In stage 2 select Basestar 1 and click the Make Icon button.
Note : You may have to select the name, not the ship itself due to a bug in FRED.
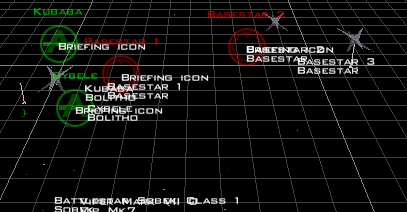
Repeat the process for Basestar 2 and both Bolithos (you may have to move the icons you've already created around in order to do this. Position them so that the Bolithos are close to Basestar 1 while Basestar 2 is off on its own. The stage should look something like this.
In Stage 3 click on the Persephone and add an icon for it too. Position it below the basestar at the bottom of the window.
In Stage 4 click on the player's Viper and add an icon for it. For the first time, we're going to have to alter this icon as it's not of the right type. Change the Label to Red Wing and the Icon Image to Fighter Wing. Position the icon to make it look as if it's travelling from the Battlestar to engage the Basestar.
That's the briefing done. Save the mission and play it. You can see if your positionings are correct in the mission and change them if you wish.
As you can see, simply placing ships isn't enough to make them do what you want. The Persephone sits out the fight and does nothing while Basestar 3 isn't even supposed to be in the mission yet! We're going to have to do something about that. The first thing to do is to make the Persephone move in and try to kill the 1st Basestar. They're a couple of ways we can make a ship approach another and try to kill it. This time we're going to do it by using the waypoint we placed earlier together with the most powerful part of FRED, the Events Editor. If you want to script combat between slow moving capital ships, waypoints are especially useful. You can't script combat for fighters with them as easily because you can't predict where they'll be after a dogfight (fighters can easily get drawn kilometres away from where you expect them to be in the course of a dogfight).
Open the Events Editor. Click New Event and then double click on the newly created event so you can rename it "Persephone Moves In For Kill". Now we'll give the Persephone AI something to do. We're going to tell it to move in and attack Basestar 1. Read the section on SEXPs (Don't just skim it, we'll be using SEXPs heavily and you need to understand what they can do for you). Change the event so that it looks like this.
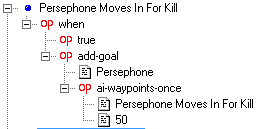
Remember that you can use the right mouse popup menu to add these commands, rather than just typing the SEXPs in by hand. This event tells the Persephone to approach the waypoint . As soon as the Persephone gets close enough to the Basestar, it will automatically open up with its turrets. That's great but as soon as Basestar 1 is dead, all 3 ships will just sit there and ignore Basestar 2. We've already created waypoints for the Bolithos to go to, so we can just tell them to go there.
We haven't created one for the Persephone, though.
The problem is that we know exactly where the Bolithos will be when the Basestar is killed since they aren't moving. We don't know where the Persephone will be though. It might still be moving towards the Basestar or it might have already arrived. If you tell the Persephone to then turn and head towards a waypoint near Basestar 2, there's a danger of having it end up in a position where it can't hit the basestar with its forward guns cause it's pointing slightly in the wrong direction.
So this time we're going to try the other method for getting it to approach and kill the enemy ship. Instead of giving the Persephone a waypoint to go to, we're instead simply going to tell its AI to approach and kill the basestar. Much easier, right? Create another event like this.
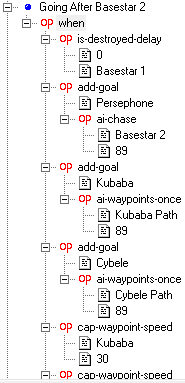 You'll need to use the Add Operator
or Add
Paste options to add the 2nd and 3rd add-goal SEXPs
etc. The last SEXP
which you can't quite . see is a cap-waypoint-speed for
the Cybele.
It's the same as the one for the Kubaba
So why have we used two different ways to do the same thing? Surely one is better than the other. Actually no, the method you should use depends on what you are trying to achieve. Because unfortunately, neither method is perfect. Both can screw up your mission.
If you give a ship a waypoint, the ship will try to go there. You also have the advantage that you can use cap-waypoint-speed to limit the speed of the ship. This is very useful here as we don't want the Bolithos to arrive before the Persephone. If we don't slow them down, Basestar 2 will kill them long before they get in range.
Unfortunately however, sometimes AI controlled ships miss their waypoint and get close without actually hitting the waypoint. In which case your kilometre long battlestar will turn around and try to fly over that waypoint again. There are even reports of people seeing capships breakdancing on the spot as they struggle to hit a waypoint they keep missing by only a couple of metres.
Using ai-chase has a similar flaw. Instead of giving the enemy a full broadside or simply opening up with the main forward guns the AI will often attempt to fly in circles around the enemy ship. When both capital ships are doing this it can look quite ridiculous.
For this reason it's quite a good idea to use these SEXPs to get the capital ships to approach each other but to tell them to do something else (even if it's just to stay in position) once they are close enough.
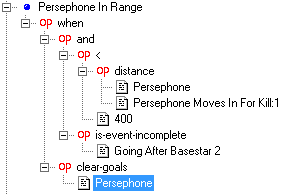 This
event will cancel the Persephone's approach on Basestar 1 when it
gets close
enough to the waypoint that it's firing.
Note : Due to the way that the Events Editor only updates properly when it's closed you might find yourself unable to find the Going After Basestar 2 Event. If so, simply close the editor and then reopen it.
You can see we've made the trigger a two parter here. The AI goals are only cleared if the ships aren't going after the 2nd Basestar already. This allows for problems such as if the 1st Basestar is killed before the Persephone is in position. You wouldn't want the Going After Basestar 2 event to trigger and then have the Persephone stop going after Basestar 2 because it was suddenly in range of that waypoint.
You may have also noticed that the first set of orders we gave the Persephone had a priority of 50 while the second set were 89. Higher priority orders will always be carried out first. That means if Going After Basestar 2 becomes true before the Persephone reaches the waypoint it won't continue heading towards it but will instead follow the higher priority order of going after Basestar 2.
 Now
we need to cancel the order to make everything go after Basestar 2
once they
are in range. Create this event for the Persephone and then create
two more
like it for the Kubaba and Cybele.
There is a better way to do this, but we're doing things simply for now. Later on I'll show you how using the argument SEXPs could have done this in one event.
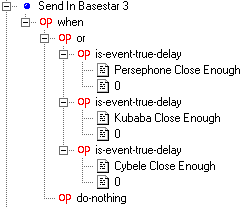
 The last thing we're going to do in this round of
changes is deal with Basestar 3. The event on the left doesn't
actually do
anything but what we're going to do is use it as the trigger for
the basestar
to actually arrive. Open the Ships Editor for
Basestar 3 and
make the SEXP on the right its Arrival Cue.
Tip : There is no reason you couldn't have just used the contents of this event as Basestar 3's arrival cue. But doing it this way is a good habit. You can refer to the event in other events, you can keep all the complex SEXPs in one place rather than spreading them all over the place, and most importantly, you can easily alter the arrival cue for the Basestar directly from the Events Editor. When you have multiple ships using the same arrival cue, this is very useful as you can change when they all arrive from one place rather than having to select them individually and alter them (and thereby risking forgetting one of them).
Save the mission again.
We've placed the capships and given them something to do. Now it's time we started getting the player involved. This is often the point at which many beginning FREDders make a dreadful mistake. They forget that the player must influence the mission in some way. Battlestars and basestars are largely invulnerable to the damage a fighter craft can do to them (unless they are carrying nukes or anti-subsystem weapons).
The player can help the Bolithos survive by shooting down bombs but if we made this the main focus of the mission it would get very boring. It should be something the player does when there are no enemies around, just to help out a bit.
The main job of a Viper pilot is to kill Raiders, but if the player's only job is to kill Raiders, the mission becomes a "turkey shoot" where the players job is to kill some arbitrary number of Raiders during the mission in order to succeed. Or alternatively if you put lots of Raiders in, the players only job is to survive while the capital ships do their business.
Although both these mission types can be fun once in a while, it's generally better to have the player's actions actually change the outcome of the mission. We're going to make it so that the player must stop Basestar 2 from being repaired and jumping out. We'll also add a secondary goal of preventing Basestar 2 getting resupplied with nuclear torpedoes from Basestar 3.
Place four Heavy Raiders in the mission (it really doesn't matter where you put them, so just place them somewhere with lots of space around them so they won't be in the way). Select all four and use the Form Wing button. Call the wing Rampart.
The default properties of this wing aren't what we want so we're going to use the Wings Editor to change them. Choose Hotkey and Set 3 (F7). Change the Arrival -> Location to Docking Bay and the Target to Basestar 3. Change the Cue to this.
 This
makes it so that the Heavy Raiders we just placed
will fly out of the docking bay of the 3rd basestar eight seconds
after the
Basestar jumps into the mission.
Now change the Departure to Location -> Docking Bay, Target -> Basestar 2 and we change the Cue to be when Rampart has been in the mission for 1 second. (using has-arrived-delay again). This makes them land on the 2nd Basestar.
Exit the Wings Editor and select Rampart 2, 3 and 4 at the same time (use the shift key or draw a box around them). Open the Ships Editor and change the Cargo to FTL Parts. Open up the Ship Flags Editor and tick the Scannable option. Now do the same thing to Rampart 1 but change the Cargo to Torpedoes.
Save the mission.
The Raiders now appear, and fly to the basestar, but this has no effect on the mission itself. We're going to change that now. Open up the Events Editor again and add the following events.
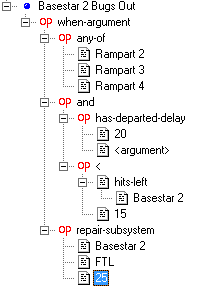 Remember
I said there was a better way of doing the
Persephone/Kubaba/Cybele Close
Enough events. Here it is. We're using the one of the Argument
SEXPs. What this
SEXP does is replace the word <argument> with some or all of
the
arguments from the list. In this case, Rampart 2-4.
So first the game will check if Rampart 2 has departed 20 seconds ago and that the 2nd Basestar is down to less than 15% damage. Then it will move on and check the same for Rampart 3 and 4. If any of them have, the rest of the event will trigger.
Open the Ship Editor for Basestar 2 and set the Departure Cue to is-event-true-delay -> 0, Basestar 2 Bugs Out.
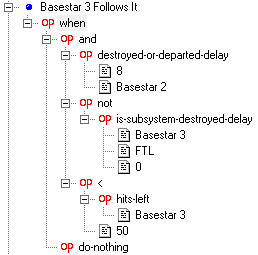 Basestar 3 leaves 8 seconds after Basestar 2 successfully
jumps out or is
destroyed. Unless of course it also has suffered FTL subsystem
damage. This
event will be in Basestar 3's Departure Cue. Use
is-event-true-delay to make it leave when this event is
true.
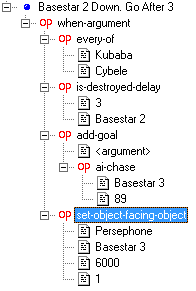 This event makes the Bolithos go after the
3rd Basestar. The Persephone on
the other hand will just turn on the spot (taking 6000
milliseconds to make the
turn). Note that in this case we're using <argument > in the
actions part
of the event so that we can make both ships do something.
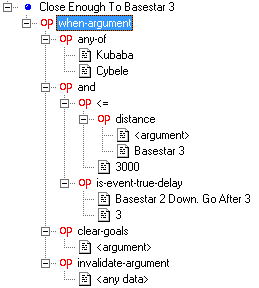 And here's the event that stops the Bolithos
getting too close to Basestar 3.
It will need a trigger count of 2.
***Explain Trigger Count***
Save the mission again.
Now's probably a good time to start working on the Mission Goals. All the major events are in place but we haven't started placing fighters yet to get in the way. Open the Mission Goals Editor and we'll add some.
| Goal Type | Name | Text | Formula | Other |
| Primary | Destroy Basestar 1 | Destroy Basestar 1 | is-destroyed-delay -> 0, Basestar 1 | |
| Primary | Destroy Basestar 2 | Destroy Basestar 2 | is-destroyed-delay -> 0, Basestar 2 | |
| Secondary | Destroy Basestar 3 | Destroy Basestar 3 | is-destroyed-delay -> 0, Basestar 3 | Objective Invalid |
| Secondary | Protect Bolithos | Protect the Kubaba and Cybele | 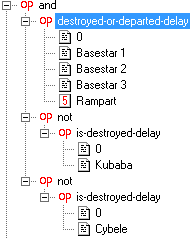 |
|
| Bonus | Prevent Rearm | Prevent the basestar getting nukes | 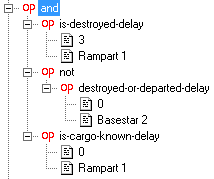 |
We made the 3rd objective invalid because we don't want the player to know there will be a 3rd basestar until it jumps in. Later on we'll add a SEXP to validate this objective.
Save the mission.
We're going to deal with some of the smaller issues next. There's no set time that these things need to be dealt with but we might as well handle them now and get them out of the way. Open the Team Loadout Editor and untick all the weapons except the HD-70 Lightning Javelin and the AGM-41 Whiplash.
Note : The Team Loadout Editor doesn't affect the weapons already on board the fighters you place by default. So it doesn't matter if we turn off things like the MEC-A6 as the player ship is already equipped with one.
Next open the Mission Specs Editor and give the mission a Title, the choice is entirely yours. Add your own name under Designer. For Built-in Command Messages -> Sender choose Persephone and for Persona use Colonial Command. For Mission Music choose 3 - Legend of Minos as the Default.
Open up the Event Editor again. We need to warn the player when he's about to get caught in the blast of an exploding Basestar as these can be fatal. Use the New Msg button to add these messages.
| Name | Message Text |
| Stand Clear Of Basestar 1 | Basestar 1 has fallen below critical. All fighters withdraw to minimum safe distance. |
| Stand Clear Of Basestar 2 | Basestar 2 has taken critical damage, all ships avoid the blast. |
| Stand Clear Of Basestar 3 | All fighters, stand clear of Basestar 3. |
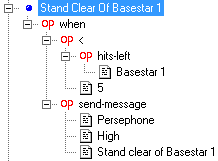 You'll need events to send the messages too.
So create 3 events like this
one. One for each basestar.
Now open the Background Editor choose Suns -> Add and then change the settings for the new sun to Stars_Sun_YHaze, H = 90, Scale = 10.
In Misc -> Number Of Stars, drag the slider down to 0 to turn off the old, ugly stars effect.
Next to the Skybox Model button type SkyBox_Lava_Sun.pof to make this our background skybox (Don't press the button. You won't be able to select the skybox since they are packaged up in the game's VP files and the button only allows you to search unpackaged files. If you type in the name, the game will still search the package file and find the skybox. If you create your own skyboxes, you can use the button).
You won't see the skybox actually change until you save the mission. So do this now.
By default, none of the ships involved in this battle will have nukes. We need to change this. Basestar 3 should be armed with nukes as soon as it arrives in the mission and Basestar 2 should get enough to launch a couple of volleys of them at the Persephone if the Heavy Raider manages to dock with it.
Select the third basestar and open up the Ship Editor's Weapons Editor. You want to change Missile Bank 1 to Cylon Nuclear Torpedo for the following turrets.
Basestar 2 will require work in the Events Editor as we only want it to get nukes if the player fails to kill Rampart 1 before it can dock.
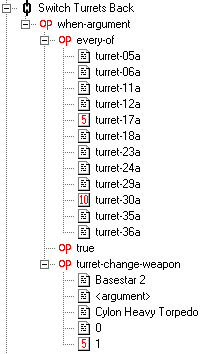
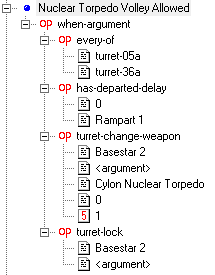 This event switches over Basestar 2 to
nuclear torpedoes as soon as the Heavy
Raider lands. We then lock the turrets (to simulate the time it
will take to
load the torpedoes and also in case the turret just fired).
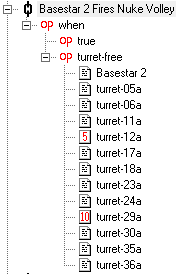 This event unlocks the turrets. It is
chained to the event above it, which
means that it can only trigger the once the Chain Delay
has
passed after the event above it has occurred. So tick the
Chained box for this event and set the Chain
Delay to 60.
 This
event has a Chain Delay of 30 and is used to
reset the turrets
back from nukes. The Basestar turrets take 40 seconds between
volleys of both
kinds of torpedo so setting it to 30 seconds means that all the
turrets will
fire nukes but won't get to fire two.
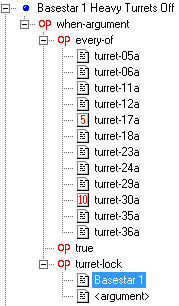 Another problem we've been having is that
Basestar 1 will quite happily blow
away both Bolithos in under a couple of minutes. This looks rather
bad since if
the basestar is that dangerous, the Colonials should have
withdrawn the
Bolithos rather than leaving them to be slaughtered. We really
need to stop
them dying as quickly. We can just do the same thing we've done
here at the
start of the mission to remove the most powerful weapons from the
Basestar. Use
this event to turn off all the heavy turrets on Basestar 1.
As you can see we've just copied and pasted the Nuclear Torpedo
Volley
Allowed event and changed it a little to make it suit us.
Save the mission.
We'll need some events for the Colonials to decide to beat a retreat if they start losing the battle.
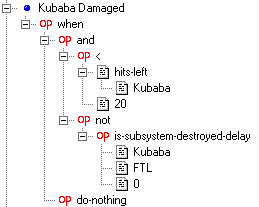
Create this event and then using the Ship Editor set the Kubaba's Departure Cue to 20 seconds after this event comes true (Use is-event-true-delay with a delay of 20).
You should also create a corresponding event for the Cybele.
The Persephone will be harder to deal with though as unlike the Bolithos it will need to reel in its fighters before it jumps out. In addition the Bolithos are less likely to stick around if a second Battlestar is forced to retreat from the same battle they are involved in. We'll need a few things before we can create the new events we'll need. First, create these messages.
| Message Name | Text |
| Persephone Prepares To Leave | We've taken serious damage, we don't have much choice, we're going to have to pull out. All fighters, land immediately. |
| Jump Countdown | Persephone will depart in $JumpCountdown seconds |
The $ sign means that JumpCoundown is a variable. The game will update what will be in that section as the mission continues. Use the Add Variable option in the popup menu to add a new variable called JumpCountdown. Set the Default Value to 60. Now create the following events.
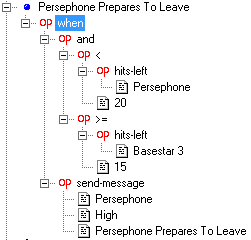 In this event we also check the status of
Basestar 3 too because we don't
want the Persephone to start screaming about how it has to
withdraw when the
Basestar is on the edge of being killed.
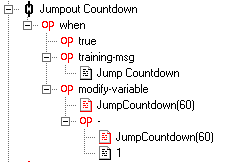 Make the Chain Delay 0, and the
Trigger Count 60.
There's a lot of new stuff in this event. First thing is that we're sending the message not using the send-message SEXP we'd used before but instead using the training-msg SEXP. The difference between the two largely surrounds where they are show on the HUD. Training messages are usually used to send messages telling the player information that is either being sent from the ship itself or is explaining how to play the game. It was originally used in the training missions (hence the name).
The other thing going on is the use of the modify-variable SEXP. Every time that this event triggers the JumpCountdown variable is reduced by one. This means that the number of seconds left in the message should go down a second at a time, giving us a proper countdown.
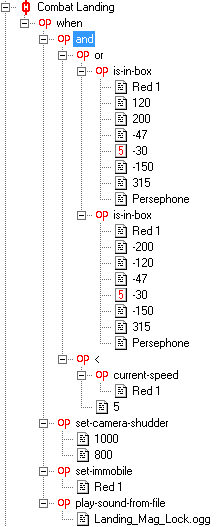 This
is a
Directive. Directives are special events that
display a
message on the HUD telling you what to do. They are frequently
confused with
Objectives (also known as Goals)
which if you
remember, we filled in earlier using the Mission Objectives Editor.
When the
event comes true, a directive will be marked on the HUD as
completed. If it is
impossible to complete a directive, it will turn red. To make this
event into a
directive you simply need to fill in the Directive Text.
Type
Combat Landing Authorised into that box and the event will turn
red, indicating
that it is a directive. We also want it chained (with a Chain
Delay of 0).
When the player does get close enough to the landing bay, we shake the camera a little, prevent them from moving and play a sound to make it sound like the ship has landed on the deck.
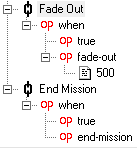 A couple of events to make the mission fade
to black and
then end. Six second delay on the first chain and one second on
the second
chain.
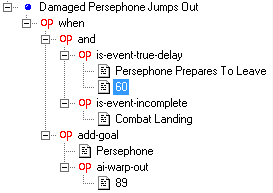 And here's the event that actually jumps the
Persephone out. We're going to
use the ai-warp-out goal but there is no reason you
couldn't have just
set the Persephone's Departure Cue to this
event.
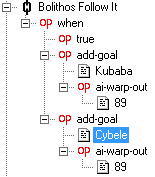 And this
event set to occur one second later will make the Bolithos jump
out too.
Save the mission again.
I suppose since we've now added the bad ending (or at least one of them) we should add the other endings as well. Add the following events.
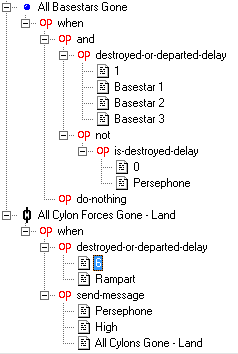 Chain Delay of 4 between the two events.
You'll also need a new message called All Cylons Gone - Land with
the following
text "Autoland is still down since we had to turn off the CNP in
case there
there were other back doors we didn't know about. You'll have to
perform a
manual landing instead."
As with the earlier combat landing, we'll also need a set of events to handle the landing for this eventuality. However it is much smarter to simply reuse the set we've already created instead of making a new set. That way if we later discover a mistake, we only need to fix it in one place. Use the Insert Event button to add this event between the Jumpout Countdown and Combat Landing events. The game will try to make it a chained directive by default so you must turn that off by unticking the Chained option and deleting the Directive Text.
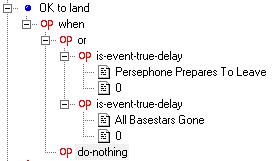
Save the mission.
It's now time to add the fighters (on both sides) into the mission. Somewhat perversely despite the fact that dealing with fighters is about 90% of what the player will be doing in the mission, most of the time you can simply dump fighters into the mission, give them some initial orders and leave them to get on with it. Unfortunately getting proper BSG style launches (from basestars or battlestars) requires a lot more effort. The Diaspora team hope to greatly improve this issue in future releases, but for now, if you want a tube launch, or you want the raiders to pop out of their toast racks, you're going to have to do it manually in FRED. For this reason, in order to keep things simple we're going to handle the raiders by simply having them jump in with the basestar rather than appearing in the racks and launching.
First let's create the new wings. In each case you'll have to create the ships, alter them to have the properties required and then select them and use the Form Wing option. Some ships will have to be moved into position automatically by the game. For this reason you should position them somewhere neatly like we did with Rampart wing.
| Wing Name | Number And Type of Ship | Position | Notes |
| Blue | 2 x Viper Mk VII | Between Basestar 1 & 2 | |
| Grail | 1 x Raider | Between Basestar 1 & 2 | |
| Fractal | 2 x Raider | Between Basestar 1 & 2 | These 3 wings are meant to be in a dogfight when the player arrives. So position them close to each other. |
| Halo | 4 x Raider | Anywhere | Ship Editor -> Weapons
-> Missile Bank 1 + 2
: LRT-AP 2.2 Shipwreck
Arrival Cue : 1 second after Basestar 3 arrives (use has-arrived-delay) Location : Near Ship Target : Basestar 3 Distance : 1000 Departure Cue : 8 Seconds after Basestar 2 & 3 are either departed or destroyed. Initial Orders -> Disarm Ship, Persephone, 30 |
| Ion | 4 x Raider | Anywhere | Arrival Cue : 10 seconds after Basestar 1 is destroyed
(use the is-destroyed-delay SEXP)
# of Waves : 2 Delay Between Waves -> Min : 8 Max : 15 Location : Near Ship Target : Basestar 2 Distance : 1000 Departure Cue : 8 Seconds after Basestar 2 & 3 are either departed or destroyed. |
| Jack | 4 x Raider | Anywhere | Arrival Cue : 2 seconds after Rampart
arrives
Location : Near Ship Target : Rampart 1 Distance : 1000 Departure Cue : 8 Seconds after Basestar 2 & 3 are either departed or destroyed. Initial Orders ->Guard, Rampart, 50 |
| Kilo | 4 x Raider | Anywhere |
Arrival Cue : 25 seconds after Ion and Jack are destroyed but only if Basestar 3 hasn't been destroyed. Location : Near Ship Target : Basestar 3 Distance : 1000 Departure Cue : 8 Seconds after Basestar 2 & 3 are either departed or destroyed. Initial Orders : Guard, Rampart, 50 |
| Black | 4 x Viper Mk VIIe | Anywhere | Weapons -> Missile Bank 1 : HD-70 Lightning Javelin |
Now we'll want to reform Red wing so that the player has some wingmen. Add 3 Viper MK VII's near Red 1, drag a box around all 4 Vipers and click Form Wing. You should get a popup asking you if you want to reform Red Wing. Click Yes. Give Red Wing Initial Orders to protect the Persephone, Cybele and Kubaba.
Save the mission.
An unfortunate problem with the current Diaspora builds is that tube launches are ridiculously complex (and get even worse if you are trying them with a player ship from a moving Battlestar). Something is wrong in the code which results in the player ship bouncing around the inside of the ship like a pinball before getting ejected through the side of the ship. For this reason we're not going to bother with a tube launch in the tutorial. We'll just position the ships from Red and Black wing outside the tubes and make it look like they just launched. You should already be capable of figuring out how to do this using the Objects Editor or just positioning them by hand.
Next we're going to add a few more directives. These will be pretty simple as all these do is tell the player to kill enemy ships. Usually you'd need to chain the directive to an event (or use is-event-true) to make it only appear on screen at the right time but the FS2_Open engine is pretty good at telling when a ship is present and can be killed so we don't need to do that here.
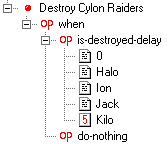 Here's the directive for all the Raider
wings that jump in after the mission
has started. I've set the Directive Text to
Destroy Cylon
Raiders same as the name of the event. If you wish you could have
separate
directives for each wing but remember that you will also need to
add a
directives for Rampart, Fractal and Grail and the game only
supports 5
directives on screen at a time.
Read up on the Debriefing Editor and then open it and add the following stages.
Note : When playing debriefs the game will go through the list and play ANY that match the conditions at the end of the mission. It will not just play the first one. For this reason you have to be careful when writing debriefings. A happy debriefing celebrating the destruction of the enemy basestars will seem out of place if it is immediately followed by a stage lamenting the destruction of the Persephone.
| Stage | Formula | Text | Comments |
| 1 | 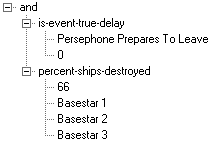 |
The Persephone took serious damage in this battle forcing
her to retreat. The Triton also suffered heavy damage and
both Battlestars will be out of action for months while we
repair the damage.
However we did at least as much damage to the Cylon forces in return so Fleet Headquarters believe if we can keep up this rate of attrition we should be able to win the war. |
By checking if 66% of the 3 Basestars are killed we allow for situations where one of the Basestars escapes. |
| 2 | 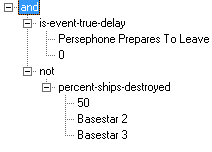 |
The Persephone took serious damage in this battle forcing
her to retreat. The Triton also suffered heavy damage and
both Battlestars will be out of action for months while we
repair the damage.
The Cylons however took much less damage than we did. We simply can't deal with this level of attrition. Two battlestars down while the two Cylon Basestars are still capable of action is not a good rate of exchange. |
|
| 3 |  |
OK pilots, you survived your first sortie against the Toasters. But now is not the time to celebrate. We're still getting reports of Cylon ships all over the colonies. We've got a lot more work to do. | This text is mainly here so that there is something that comes before the other stages of the debrief. |
| 4 |  |
The Kubaba was destroyed in the battle. She was a fine ship and I know the Commander herself was once its CO. | |
| 5 |  |
The Cybele did not survive the engagement. Fleet Command have expressed surprise at the inability of the Bolitho class to survive against Cylon capital ships. If we are forced to only commit Battlestars against the Cylons the war could last a lot longer. | |
| 6 |  |
The destruction of three Basestars however will be a cause
for celebration once we get some time to catch our breath.
Fleet Headquarters have stated that it is possible that
Cylon FTL systems maybe vulnerable to attack as the
destruction of at least two of the Basestars was definitely
attributable to the destruction of their FTL systems.
The Admiral has stated that he agrees with the general feeling that the Cylons had counted on their hacking of the CNP program to cripple our forces and are completely unable to deal with a Battlestar at full strength. |
|
| 7 |  |
Fleet Headquarters has expressed its disappointment that Basestars 2 and 3 escaped. It is vitally important that we keep inflicting heavy losses on the Cylons while they are off balance, before they can regroup for a counter-attack. | |
| 8 | 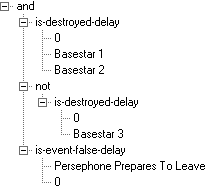 |
The destruction of two Basestars however will be a cause
for celebration once we get some time to catch our breath.
The Admiral has stated that he agrees with the general feeling that the Cylons had counted on their hacking of the CNP program to cripple our forces and are completely unable to deal with a Battlestar at full strength. We must make every effort to destroy as many of them as we can before they can evolve a strategy to deal with them. |
We check that the Persephone didn't jump out cause we don't want this debrief to conflict with stage 1. |
Save the mission.
Note : At the moment you can see the debriefings by pressing ALT J which will cause the Viper to jump out. Obviously we'll have to fix this before we're done as Vipers don't have jump engines. Warning : In missions where you have a jump capable ship you must take care that the player doesn't successfully complete the mission simply by jumping out to early. This isn't an issue in our mission as we'll make the mission end when the player lands on the Persephone (or have a special ending if the Persephone is destroyed.)
We're in the home stretch now. Just a few minor things to change. Firstly we need to validate the goal for Basestar 3.
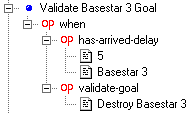
Next we need to stop the player jumping out. Use the Selection List from the Toolbar to select Red and Black wings. Open up the Ship Editor and in the Ship Flags Editor (Misc) select No Subspace Drive.
Select the Cybele and Kubaba in the same way and from the Ship Editor -> Player Orders untick everything (So that the player can't order the Bolithos around).
Save the mission one final time.
They say that art is never finished, only abandoned. This is very much true when it comes to mission design. Although there is always the temptation to fiddle with the mission one more time and add just a few more events, eventually the point comes when you should move on and work on another mission (or release the mission\campaign!).
We're probably not at that point yet though. The idea was to create a playable mission and we've already done that so this is a good point to end the walkthrough. But if this was a mission that would be part of an official Diaspora campaign, we probably wouldn't be stopping just yet as there are many things that can be done to improve the mission. I'm going to give you a list of some of the things that are missing in case you feel like carrying on.